How To: Make Your Geni Tree More Active (Part 1)
On Geni the objective is to create a collaborative environment where multiple family members can work together to build, share, and preserve a rich family history. With each additional family member getting involved, the workload decreases that much more and/or the amount of shared content increases that much more. Therefore, over the next three days we will be posting a 3 part guide that will help you activate your tree in becoming a truly collaborative environment.
Step One: Lay the Groundwork
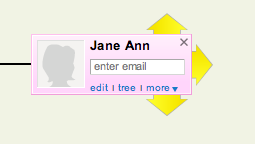
Before you expect your family members to add content you should first build out the tree as much as you can. This will lay the groundwork and create the social graph in which your family members will be able to join and participate in. To do this go to your Tree and click the yellow arrows:
Top Arrows add Father or Mother
Side Arrows add Sister, Brother, Wife, or Husband
Bottom Arrows add Son or Daughter
Reminder: As you add the living relatives to the Tree make sure you invite them by entering their email address into the ‘enter email’ box.
Step Two: Invite Family
If you did not have the email address for some your family members at the time you added them to the Tree you will still want to make sure that you invite them. One way to increase the likelihood that they accept your invitation is to create a custom invitation. Sometimes people receive emails and they are not sure if they are really from the person that the message says they are, so the email ends up being deleted. However, if you customize the invitation template and explain to them why it is important that they join, there is a greater likelihood that they will accept the invitation and join the tree. Another reason for creating a custom invitation template may be because of a language barrier. If the primary language the recipient speaks is Spanish and the default Geni template is in English, they may not understand what the invitation is for. To create a custom invitation click the Invite link in the upper right hand corner of any page within Geni. Then click the Edit Invitation Template link in the upper right hand corner of that page. It is there that you will be able to create the custom invitation template that will best convince your family to join.
Remember: After you change the template, that will be the invitation that is sent out to each person. However, at any time you can go back to the Edit Invitation Template page and click ‘Restore default subject and message’ to do just that.
Now that you have created a custom template you should go back to the Invite page and start inviting your family members. This page will automatically list all of the living people in your family, that are on your Tree. Go through the list, add each family members email address, and click the ‘Invite’ button to generate the invitation.
If you enjoyed this post and would like information on how to engage your family once they’ve joined Geni, come back tomorrow for (Part 2).


 Genealogy Discussions
 Genealogy Projects
 Popular Genealogy Profiles
 Surnames
 The Geni Blog
 The World Family Tree